就是做了一些整理~常用系统工作命令,系统状态检测命令,工作目录切换命令,文本文件编辑命令,文件目录管理命令,打包压缩与搜索命令~
常用系统工作命令
echo
echo 命令用于在终端输出字符串或变量提取后的值,格式为“echo [字符串 | $变量]
1 | [root@linuxprobe ~]# echo Linuxprobe.Com |
date
date 命令用于显示及设置系统的时间或日期,格式为“date [选项] [+指定的格式]”。
| 参数 | 作用 |
|---|---|
| %t | 跳格[Tab 键] |
| %H | 小时(00~23) |
| %I | 小时(00~12) |
| %M | 分钟(00~59) |
| %S | 秒(00~59) |
| %j | 今年中的第几天 |
1 | [root@linuxprobe ]# date |
reboot
reboot 命令用于重启系统其格式为 rebo1
[root@linuxprobe ]# rebo
poweroff
poweroff 命令用于关闭系统,其格式为 powerof
1 | [root@linuxprobe ~]# powero |
wget
wget 命令用于在终端中下载网络文件,格式为“wget [参数] 下载地址”
| 参数 | 作用 |
|---|---|
| -b | 后台下载模式 |
| -P | 下载到指定目录 |
| -t | 最大尝试次数 |
| -c | 断点续传 |
| -p | 下载页面内所有资源,包括图片、视频等 |
| -r | 递归下载 |
1 | [root@linuxprobe ~]# wget http://www.linuxprobe.com/docs/LinuxProbe.pdf |
ps
ps 命令用于查看系统中的进程状态,格式为“ps [参数]”。
| 参数 | 作用 |
|---|---|
| -a | 显示所有进程(包括其他用户的进程) |
| -u | 用户以及其他详细信息 |
| -x | 显示没有控制终端的进程 |
➢R(运行):进程正在运行或在运行队列中等待。
➢S(中断):进程处于休眠中,当某个条件形成后或者接收到信号时,则脱离该
状态。
➢D(不可中断):进程不响应系统异步信号,即便用 kill 命令也不能将其中断。
➢Z(僵死):进程已经终止,但进程描述符依然存在, 直到父进程调用 wait4()系统函数后将进程释。
➢ T(停止):进程收到停止信号后停止。
表 2-7 进程(ps -aux)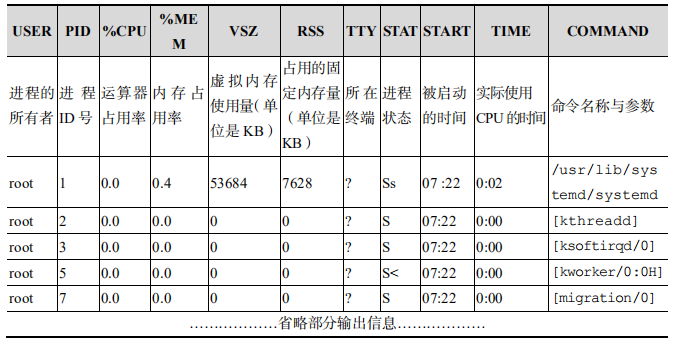
top
top 命令用于动态地监视进程活动与系统负载等信息,其格式为 top。
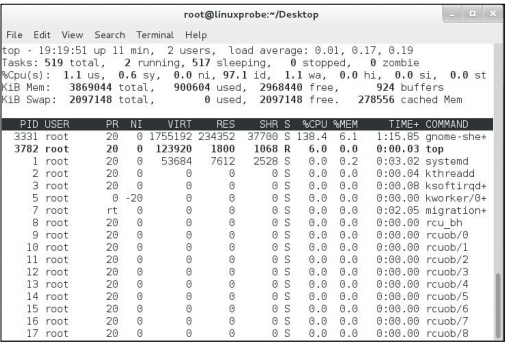
➢ 第 1 行:系统时间、运行时间、登录终端数、系统负载(三个数值分别为 1 分钟、5
分钟、15 分钟内的平均值,数值越小意味着负载越低)。
➢ 第 2 行:进程总数、运行中的进程数、睡眠中的进程数、停止的进程数、僵死的进程
数。
➢ 第 3 行:用户占用资源百分比、系统内核占用资源百分比、改变过优先级的进程资源
百分比、空闲的资源百分比等
➢ 第 4 行:物理内存总量、内存使用量、内存空闲量、作为内核缓存的内存量。
➢ 第 5 行:虚拟内存总量、虚拟内存使用量、虚拟内存空闲量、已被提前加载的内
pidof
pidof 命令用于查询某个指定服务进程的 PID 值,格式为“pidof [参数] [服务名称]”。
1 | [root@linuxprobe]# pidof sshd |
kill
kill 命令用于终止某个指定 PID 的服务进程,格式为“kill [参数] [进程 PID]”。
1 | [root@linuxprobe ]# kill -9 2156 |
killall
用于终止某个指定名称的服务所对应的全部进程,格式为:“killall [参数] [服
务名称]”。
1 | [root@linuxprobe ~]# pidof httpd |
系统状态检测命令
ifconfig
ifconfig 命令用于获取网卡配置与网络状态等信息,格式为“ifconfig [网络设备] [参数]。
主要查看的就
是网卡名称、inet 参数后面的 IP 地址、ether 参数后面的网卡物理地址(又称为 MAC 地址),
以及 RX、TX 的接收数据包与发送数据包的个数及累计流量。1
2
3
4
5
6
7
8
9
10[root@linuxprobe ~]# ifconfig
eno16777728: flags=4163<UP,BROADCAST,RUNNING,MULTICAST> mtu 1500
inet 192.168.10.10 netmask 255.255.255.0 broadcast 192.168.10.255
inet6 fe80::20c:29ff:fec4:a409 prefixlen 64 scopeid 0x20<link>
ether 00:0c:29:c4:a4:09 txqueuelen 1000 (Ethernet)
RX packets 36 bytes 3176 (3.1 KiB)
RX errors 0 dropped 0 overruns 0 frame 0
TX packets 38 bytes 4757 (4.6 KiB)
TX errors 0 dropped 0 overruns 0 carrier 0 collisions
0lo: flags=73<UP,LOOPBACK,RUNNING> mtu 65536inet 127.0.0.1 netmask 255.0.0.0inet6 ::1 prefixlen 128 scopeid 0x10<host>loop txqueuelen 0 (Local Loopback)RX packets 386 bytes 32780 (32.0 KiB)RX errors 0 dropped 0 overruns 0 frame 0TX packets 386 bytes 32780 (32.0 KiB)TX errors 0 dropped 0 overruns 0 carrier 0 collisions
uname
uname 命令用于查看系统内核与系统版本等信息,格式为“uname [-a]”。
在使用 uname 命令时,一般会固定搭配上-a 参数来完整地查看当前系统的内核名称、主
机名、内核发行版本、节点名、系统时间、硬件名称、硬件平台、处理器类型以及操作系统名
称等信息。1
2
3[root@linuxprobe ~]# uname -a
Linux linuxprobe.com 3.10.0-123.el7.x86_64 #1 SMP Mon May 5 11:16:57 EDT 2017
x86_64 x86_64 x86_64 GNU/Linux
uptime
uptime 用于查看系统的负载信息,格式为 uptime。
uptime 命令真的很棒,它可以显示当前系统时间、系统已运行时间、启用终端数量以
及平均负载值等信息。平均负载值指的是系统在最近 1 分钟、5 分钟、15 分钟内的压力情
况;负载值越低越好,尽量不要长期超过 1,在生产环境中不要超
过 5。1
2[root@linuxprobe ~]# uptime
22:49:55 up 10 min, 2 users, load average: 0.01, 0.19, 0.18
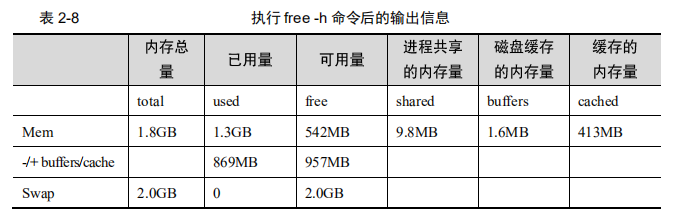
free
free 用于显示当前系统中内存的使用量信息,格式为“free [-h]”。1
[root@linuxprobe ]# free
who
who 命令用于查看当前登入主机的用户终端信息,格式为“who [参数]”。1
[root@linuxprobe ~]# who
last
last 命令用于查看所有系统的登录记录,格式为“last [参数]”。
使用 last 命令可以查看本机的登录记录。但是,由于这些信息都是以日志文件的形式保
存在系统中,因此黑客可以很容易地对内容进行篡改。千万不要单纯以该命令的输出信息而
判断系统有无被恶意入侵!1
2
3
4
5
6
7
8[root@linuxprobe ~]# last
root pts/0 :0 Mon Aug 24 17:52 still logged in
root :0 :0 Mon Aug 24 17:52 still logged in
(unknown :0 :0 Mon Aug 24 17:50 - 17:52 (00:02)
reboot system boot 3.10.0-123.el7.x Tue Aug 25 01:49 - 18:17 (-7:-32)
root pts/0 :0 Mon Aug 24 15:40 - 08:54 (7+17:14)
root pts/0 :0 Fri Jul 10 10:49 - 15:37 (45+04:47)
………………省略部分登录信息………………
history
history 命令用于显示历史执行过的命令,格式为“history [-c]”。
history 命令应该是作者最喜欢的命令。执行 history 命令能显示出当前用户在本地计算机
中执行过的最近 1000 条命令记录。如果觉得 1000 不够用,还可以自定义/etc/profile 文件中的
HISTSIZE 变量值。在使用 history 命令时,如果使用-c 参数则会清空所有的命令历史记录。
还可以使用“!编码数字”的方式来重复执行某一次的命令。总之,history 命令有很多有趣的玩法等待您去开发。
1 | [root@linuxprobe ~]# history |
sosreport
sosreport 命令用于收集系统配置及架构信息并输出诊断文档,格式为 sosreport。
这个用的不多,需要的自己查资料~
工作目录切换命令
pwd
pwd 命令用于显示用户当前所处的工作目录,格式为“pwd [选项]”。1
2[root@linuxprobe etc]# pwd
/etc
cd
cd 命令用于切换工作路径,格式为“cd [目录名称]”。1
2
3[root@linuxprobe ~]# cd /etc //进入
[root@linuxprobe bin]# cd - //返回上次
[root@linuxprobe etc]# cd ~ //用户家目录
ls
ls 命令用于显示目录中的文件信息,格式为“ls [选项] [文件] ”。
所处的工作目录不同,当前工作目录下的文件肯定也不同。使用 ls 命令的“-a”参数看
到全部文件(包括隐藏文件),使用“-l”参数可以查看文件的属性、大小等详细信息。将这
两个参数整合之后,再执行 ls 命令即可查看当前目录中的所有文件并输出这些文件的属性。1
2
3
4
5[root@linuxprobe ~]# ls -al
total 60
dr-xr-x---. 14 root root 4096 May 4 07:56 .
drwxr-xr-x. 17 root root 4096 May 4 15:55 ..
省略............
如果想要查看目录属性信息,则需要额外添加一个-d 参数。例如,可使用如下命令查看
/etc 目录的权限与属性信息:1
[root@linuxprobe ~]# ls -ld /etcdrwxr-xr-x. 132 root root 8192 Jul 10 10:48 /e
文本文件编辑命令
cat
cat 命令用于查看纯文本文件(内容较少的),格式为“cat [选项] [文件]”。1
2
3
4
5[root@linuxprobe ~]# cat -n initial-setup-ks.cfg
1 #version=RHEL7
2 # X Window System configuration information
3 xconfig --startxonboot
省略..............
more
more 命令用于查看纯文本文件(内容较多的),格式为“more [选项]文件”。1
2
3
4
5[root@linuxprobe ~]# more initial-setup-ks.cfg
#version=RHEL7
# X Window System configuration information
省略............
--More--(43%)
head
head 命令用于查看纯文本文档的前 N 行,格式为“head [选项] [文件]”。1
2
3
4[root@linuxprobe ~]# head -n 20 initial-setup-ks.cfg
#version=RHEL7
# X Window System configuration information
省略............
tail
tail 命令用于查看纯文本文档的后 N 行或持续刷新内容,格式为“tail [选项] [文件]”。
tail 命令最强悍的功能是可以持续刷新一个文件的内容,当想要实时
查看最新日志文件时,这特别有用,此时的命令格式为“tail -f 文件名”:1
2
3
4[root@linuxprobe ~]# tail -f /var/log/messages
May 4 07:56:38 localhost gnome-session: Window manager warning: Log level 16:
STACK_OP_ADD: window 0x1e00001 already in stack
省略............
tr
tr 命令用于替换文本文件中的字符,格式为“tr [原始字符] [目标字符]”。
把某个文本内容中的英文全部替换
为大写:1
[root@linuxprobe ~]# cat anaconda-ks.cfg | tr [a-z] [A-Z]
wc
wc 命令用于统计指定文本的行数、字数、字节数,格式为“wc [参数] 文本”。
| 参数 | 作用 |
|---|---|
| -l | 只显示行数 |
| -w | 只显示单词数 |
| -c | 只显示字节数 |
1 | [root@linuxprobe ~]# wc -l /etc/passwd |
stat
stat 命令用于查看文件的具体存储信息和时间等信息,格式为“stat 文件名称”。1
2
3
4
5
6
7
8
9
10[root@linuxprobe ~]# stat anaconda-ks.cfg
File: ‘anaconda-ks.cfg’
Size: 1213 Blocks: 8 IO Block: 4096 regular file
Device: fd00h/64768d Inode: 68912908 Links: 1
Access: (0600/-rw-------) Uid: ( 0/ root) Gid: ( 0/ root)
Context: system_u:object_r:admin_home_t:s0
Access: 2017-07-14 01:46:18.721255659 -0400
Modify: 2017-05-04 15:44:36.916027026 -0400
Change: 2017-05-04 15:44:36.916027026 -0400
Birth: -
cut
cut 命令用于按“列”提取文本字符,格式为“cut [参数] 文本”。
在 Linux 系统中,如何准确地提取出最想要的数据,这也是我们应该重点学习的内容。一般
而言,按基于“行”的方式来提取数据是比较简单的,只需要设置好要搜索的关键词即可。但是
如果按列搜索,不仅要使用-f 参数来设置需要看的列数,还需要使用-d 参数来设置间隔符号。
passwd 在保存用户数据信息时,用户信息的每一项值之间是采用冒号来间隔的,接下来我们使用
下述命令尝试提取出 passwd 文件中的用户名信息,即提取以冒号(:)为间隔符号的第一列内容:1
2
3
4
5
6
7
8
9
10
11
12
13
14
15
16
17[root@linuxprobe ~]# head -n 2 /etc/passwd
root:x:0:0:root:/root:/bin/bash
bin:x:1:1:bin:/bin:/sbin/nologin
[root@linuxprobe ~]# cut -d: -f1 /etc/passwd
root
bin
daemon
adm
lp
sync
shutdown
halt
mail
operator
games
ftp
省略...............
diff
用于比较多个文本文件的差异,格式为“diff [参数] 文件”。1
2
3
4
5
6
7
8
9
10
11
12
13
14
15
16
17
18[root@linuxprobe ~]# diff --brief diff_A.txt diff_B.t
*** diff_A.txt 2017-08-30 18:07:45.230864626 +0800
--- diff_B.txt 2017-08-30 18:08:52.203860389 +0800
***************
*** 1,5 ****
! Welcome to linuxprobe.com
Red Hat certified
! Free Linux Lessons
Professional guidance
Linux Course
--- 1,7 ----
! Welcome tooo linuxprobe.com
!
Red Hat certified
! Free Linux LeSSonS
! ////////.....////////
Professional guidance
Linux Course
文件目录管理命令
touch
touch 命令用于创建空白文件或设置文件的时间,格式为“touch [选项] [文件]”。
| 参数 | 作用 |
|---|---|
| -a | 仅修改“读取时间”(atime) |
| -m | 仅修改“修改时间”(mtime) |
| -d | 同时修改 atime 与 mtime |
1 | [root@linuxprobe ~]# ls -l anaconda-ks.cfg |
mkdir
mkdir 命令用于创建空白的目录,格式为“mkdir [选项] 目录”。
1 | [root@linuxprobe ~]# mkdir linuxprobe |
cp
cp 命令用于复制文件或目录,格式为“cp [选项] 源文件 目标文件”。
| 参数 | 作用 |
|---|---|
| -p | 保留原始文件的属性 |
| -d | 若对象为“链接文件”,则保留该“链接文件”的属性 |
| -r | 递归持续复制(用于目录) |
| -i | 若目标文件存在则询问是否覆盖 |
| -a | 相当于-pdr(p、d、r 为上述参数) |
1 | [root@linuxprobe ~]# touch install.log |
mv
mv 命令用于剪切文件或将文件重命名,格式为“mv [选项] 源文件 [目标路径|目标文件名]”。
1 | [root@linuxprobe ~]# mv x.log linux.log |
rm
rm 命令用于删除文件或目录,格式为“rm [选项] 文件”。
想要删除一个目录,
需要在 rm 命令后面一个-r 参数才可以。1
2
3
4
5[root@linuxprobe ~]# rm install.log
rm: remove regular empty file ‘install.log’? y
[root@linuxprobe ~]# rm -f linux.log
[root@linuxprobe ~]# ls
[root@linuxprobe ~]#
dd
dd 命令用于按照指定大小和个数的数据块来复制文件或转换文件,格式为“dd [参数]”。
dd 命令是一个比较重要而且比较有特色的一个命令,它能够让用户按照指定大小和个数
的数据块来复制文件的内容。当然如果愿意的话,还可以在复制过程中转换其中的数据。Linux
系统中有一个名为/dev/zero 的设备文件,每次在课堂上解释它时都充满哲学理论的色彩。因
为这个文件不会占用系统存储空间,但却可以提供无穷无尽的数据,因此可以使用它作为 dd
命令的输入文件,来生成一个指定大小的文件。
| 参数 | 作用 |
|---|---|
| if | 输入的文件名称 |
| of | 输出的文件名称 |
| bs | 设置每个“块”的大小 |
| count | 设置要复制“块”的个数 |
例如我们可以用 dd 命令从/dev/zero 设备文件中取出一个大小为 560MB 的数据块,然后
保存成名为 560_file 的文件。在理解了这个命令后,以后就能随意创建任意大小的文件了:1
2
3
4[root@linuxprobe ~]# dd if=/dev/zero of=560_file count=1 bs=560M
1+0 records in
1+0 records out
587202560 bytes (587 MB) copied, 27.1755 s, 21.6 MB/s
dd 命令的功能也绝不仅限于复制文件这么简单。如果您想把光驱设备中的光盘制作成 iso 格
式的镜像文件,在 Windows 系统中需要借助于第三方软件才能做到,但在 Linux 系统中可以直接
使用 dd 命令来压制出光盘镜像文件,将它变成一个可立即使用的 iso 镜像:1
2
3
4[root@linuxprobe ~]# dd if=/dev/cdrom of=RHEL-server-7.0-x86_64-LinuxProbe.Com.iso
7311360+0 records in
7311360+0 records out
3743416320 bytes (3.7 GB) copied, 370.758 s, 10.1 MB/s
考虑到有些读者会纠结 bs 块大小与 count 块个数的关系,下面举一个吃货的例子进行
解释。假设小明的饭量(即需求)是一个固定的值,用来盛饭的勺子的大小即 bs 块大小,
而用勺子盛饭的次数即 count 块个数。小明要想吃饱(满足需求),则需要在勺子大小(bs 块
大小)与用勺子盛饭的次数(count 块个数)之间进行平衡。勺子越大,用勺子盛饭的次数就越少。由上可见,bs 与 count 都是用来指定容量的大小,只要能满足需求,可随意组合搭配方
式。
file
file 命令用于查看文件的类型,格式为“file 文件名”。1
2
3
4[root@linuxprobe ~]# file anaconda-ks.cfg
anaconda-ks.cfg: ASCII text
[root@linuxprobe ~]# file /dev/sda
/dev/sda: block special
打包压缩与搜索命令
tar
tar 命令用于对文件进行打包压缩或解压,格式为“tar [选项] [文件]”。
| 参数 | 作用 |
|---|---|
| -c | 创建压缩文件 |
| -x | 解开压缩文件 |
| -t | 查看压缩包里面有哪些文件 |
| -z | 用Gzip压缩或解压 |
| -j | 用bzip2压缩或解压 |
| -v | 显示压缩或解压过程 |
| -f | 目标文件名 |
| -P | 保存原始的权限与属性 |
| -p | 使用绝对路径来压缩 |
| -C | 指定解压目录 |
1 | [root@linuxprobe ~]# tar -czvf etc.tar.gz /etc |
grep
grep 命令用于在文本中执行关键词搜索,并显示匹配的结果,格式为“grep [选项] [文件]”。
| 参数 | 作用 |
|---|---|
| -b | 将可执行文件(binary)当作文本文件(text)来搜索 |
| -c | 仅显示找到的行数 |
| -i | 忽略大小写 |
| -n | 显示行号 |
| -v | 反向选择—仅列出没有“关键词”的行 |
在 Linux 系统中,/etc/passwd 文件是保存着所有的用户信息,而一旦用户的登录终端被
设置成/sbin/nologin,则不再允许登录系统,因此可以使用 grep 命令来查找出当前系统中不允
许登录系统的所有用户信息:
1 | [root@linuxprobe ~]# grep /sbin/nologin /etc/passwd |
find
find 命令用于按照指定条件来查找文件,格式为“find [查找路径] 寻找条件 操作”。
在 Linux 系统中,搜索工作一般都是通过 find 命令来完成的,它可以使用不同的文件特性作
为寻找条件(如文件名、大小、修改时间、权限等信息),一旦匹配成功则默认将信息显示到
屏幕上。
| 参数 | 作用 |
|---|---|
| -name | 匹配名称 |
| -perm | 匹配权限(mode 为完全匹配,-mode 为包含即可) |
| -user | 匹配所有者 |
| -group | 匹配所有组 |
| -mtime -n +n | 匹配修改内容的时间(-n 指 n 天以内,+n 指 n 天以前) |
| -atime -n +n | 匹配访问文件的时间(-n 指 n 天以内,+n 指 n 天以前) |
| -ctime -n +n | 匹配修改文件权限的时间(-n 指 n 天以内,+n 指 n 天以前) |
| -nouser | 匹配无所有者的文件 |
| -nogroup | 匹配无所有组的文件 |
| -newer f1 !f2 | 匹配比文件 f1 新但比 f2 旧的文件 |
| –type b/d/c/p/l/f | 匹配文件类型(后面的字母参数依次表示块设备、目录、字符设备、管道、链接文件、文本文件) |
| -size | 匹配文件的大小(+50KB 为查找超过 50KB 的文件,而-50KB 为查找小于 50KB 的文件) |
| -prune | 忽略某个目录 |
| -exec …… {}\; | 后面可跟用于进一步处理搜索结果的命令 |
1 | //获取到该目录中所有以 host 开头的文件列表 |
1 | //在整个文件系统中找出所有归属于linuxprobe用户的文件并复制到/root/findresults目录 |
参考书籍《LinuxProbe》